
What is Git and GitHub?
Git is an open-source version control system that allows you to store different versions of the code by keeping the changes made to the code in a database called the repository. Git enables us to look at the project history and see who, when, and why made any changes. If something went wrong with the current project, you could revert it to a specific stable version.
Github is a Git repository hosting service that builds on top of Git, and it has all the features that Git offers. It also adds additional features to code development, such as project management capabilities, and collaboration. It also provides a place to store your code securely on a GitHub server. That ensures your code is secure in case of any issues with the local computer. As the world's largest open-source community, it makes a lot of additional resources available, such as version control tooling, storing code, creating branches, and tracking changes. It offers many open-source repositories that are available for anyone to use, contribute and create their version of it.
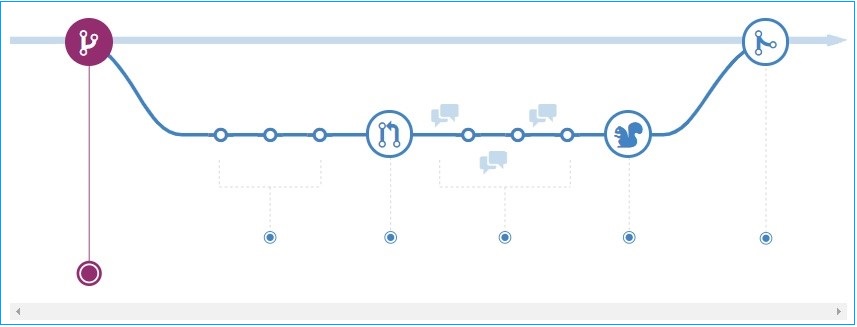
The blue line at the top shows the timeline of the main repository or main version of your code. Before you make changes to the code, you have to create a branch. Initially, this branch can be considered as the exact copy of the main version of your code. However, changes you make to this branch don’t affect the main version.
The next step is to add commits. After you create a branch, you can make changes to the code. When you add, edit or delete a file, you are making a commit.
The next step is to open up a pull request. When you merge your modified code to the main branch, it pulls the code into it. When you open up a pull request, you request the main branch to pull your changes into it, and then your changes become part of the final product.
After opening up the pull request, there will be a series of discussions and additional commits. If the changes you made look perfect, the team will approve it to merge. If there are errors or if someone suggests different methods to do the job, the team members would further discuss and review the code before getting merged in.
Before merging any code into the main branch, as a next step, you can deploy the code from the branch for testing. By deploying the code to the dev branch, you can verify that your changes are bug-free.
As a final step, once the changes are verified, the code can be merged into the main branch. GitHub records all changes that were done to the code and allows you to view the change history of files in the future.
Getting started with GitHub
When you sign in to GitHub, you will be redirected to the GitHub.com home page.
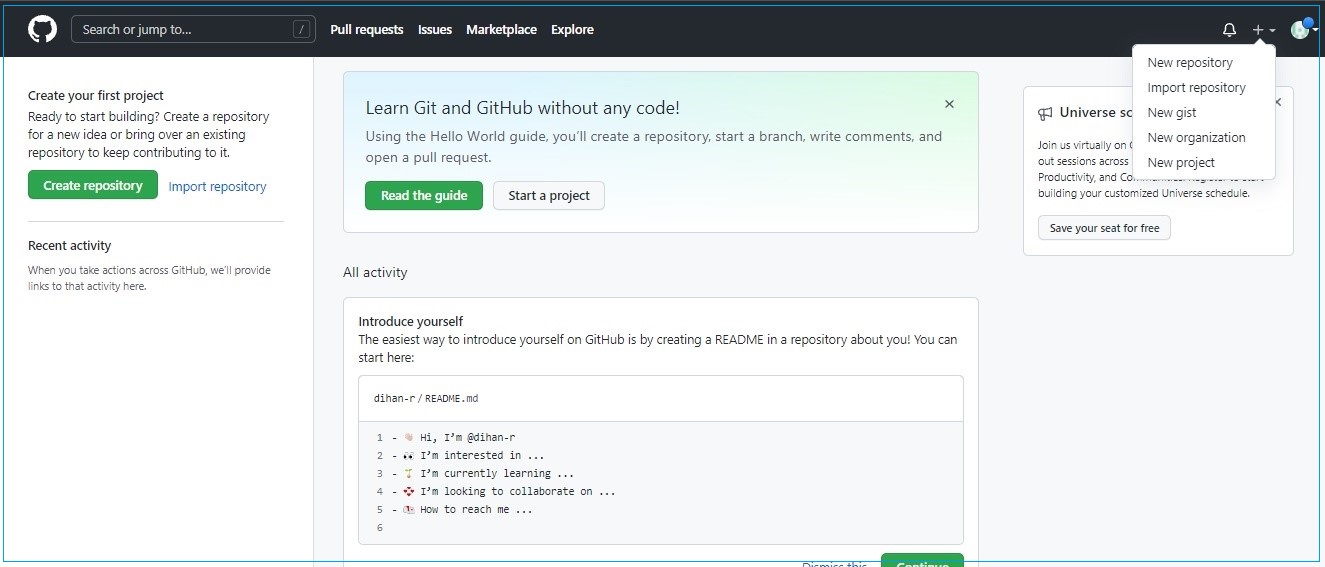
In the top right corner of the home page, you could see your avatar and settings, a notification bell that indicates all types of notifications related to your project, such as assigned, participating, mentioned, review request, etc. Using the plus button, you could add new things such as repositories or projects. On the left, you can see a list of repositories in which you are involved. In the middle section, you can see recent activities on any repositories or your account.
In addition to GitHub, we use two additional tools in this tutorial; GitHub Desktop and Visual Studio Code.
Creating a new repository
First, go to the plus (+) button and select a New repository. It will refresh your window into a new page where you are going to create a new repository.
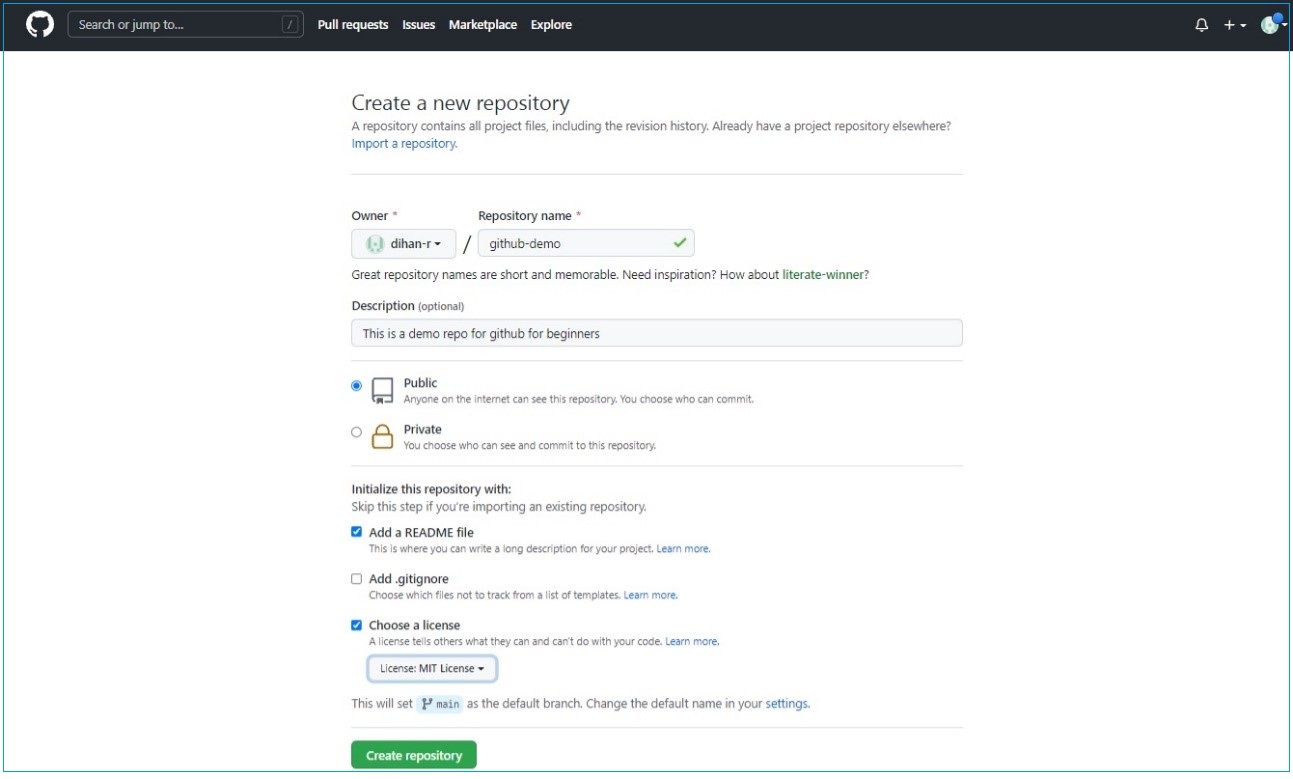
If you have multiple accounts or multiple permissions from different organizations, you can change that in the owners’ list and add a repository name. It is highly recommended to add a clear description for your repository. You can make the visibility of your repository public or private. If you make it public anyone can see it, and if you select private you choose who can see your repository.
You can also add a readme file, a .gitignore file, and a license for your repository. Readme file is the first thing someone will see when they access your repository. You can add important information about your project to this file, such as an introduction to the project, how someone can get started with the project, who maintains and contributes to the project, etc. When you add a gitignore file to your repository, you instruct Git to ignore some files and directories when you make a commit. For instance, if you have swap files or temp files created when you compile and run the code on your local machine, the gitignore file will ensure that those files don’t get committed to the repository. You can choose a license when creating the repository. If you visit choosealicense.com, several open-source licenses are available there, and it helps you find the correct license based on your requirements.
GitHub will set your primary repository name as main. You can change this default name in your settings, and it’s highly recommended to do that when you create the repository. When you click on the Create repository button, it will redirect you to your repository.
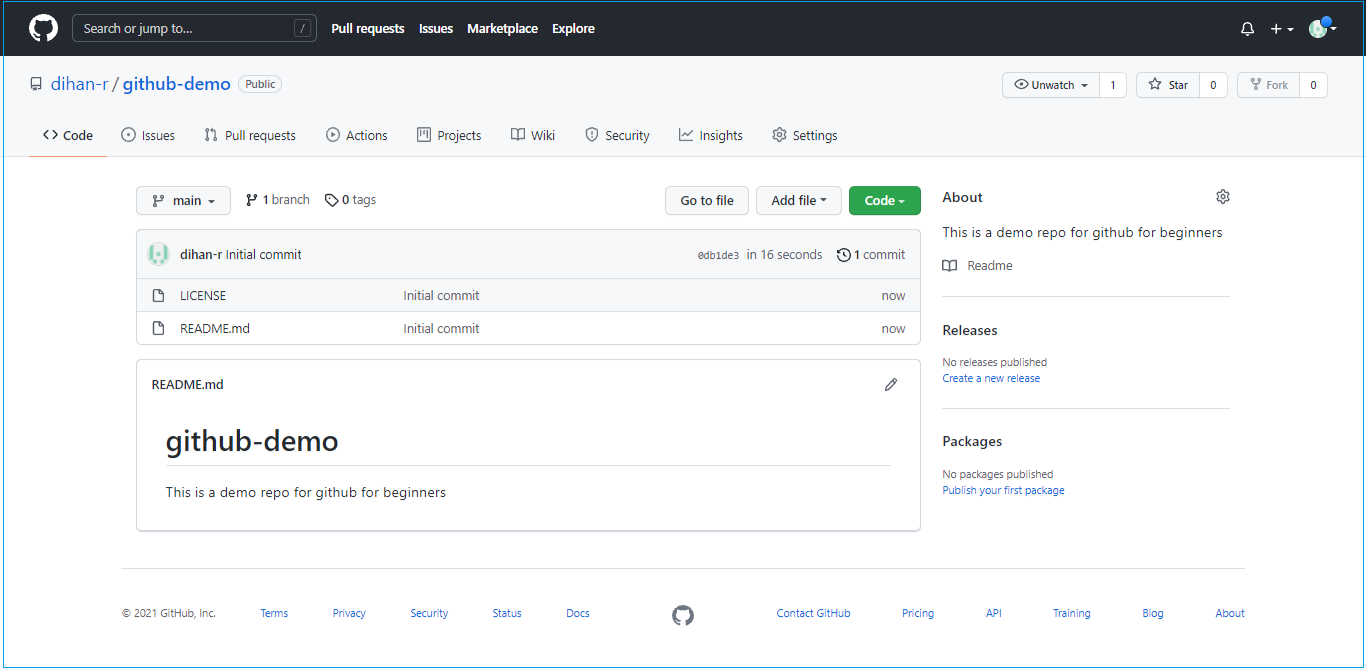
Now you are on the main branch, and at the beginning, only the license file and readme file appear in the repository. As mentioned earlier, the readme file is the first item someone sees in your repository, and it can be seen at the bottom of the page.
Cloning a repository
When you create the above github-demo repository, it will be stored in a remote GitHub.com server. Cloning creates a copy of all your repository data include files, branches, and commits, from GitHub.com to your local computer.
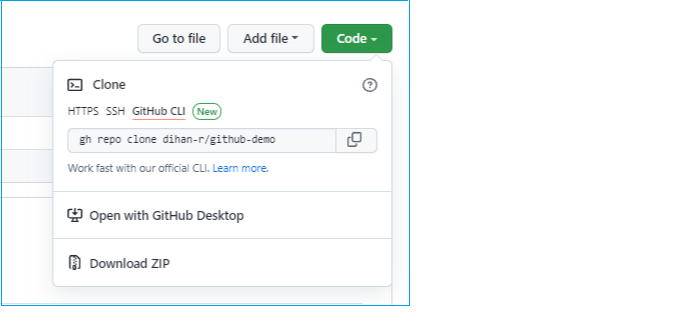
When you click on the Code button, you can see different clone options. You could either clone using HTTPS, SSH, or a command-line interface (GitHub CLI). The other options include open with GitHub desktop, open with Visual Studio, and download zip.
Here, we will choose to open in GitHub Desktop. GitHub Desktop is a GUI application that allows you to interact with GitHub. You can download the latest version of GitHub Desktop from here.
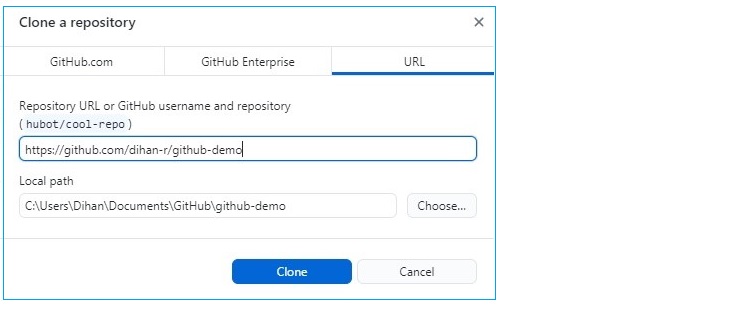
Once you choose "Open in GitHub Desktop", it will launch the Clone a repository dialog box and automatically fill the Repository URL and Local path fields based on your previous inputs.
After cloning, it will open the GitHub Desktop application. Using the Fetch origin button, you could interact with the GitHub.com server where your repository is stored. This button will change depending on the state of your local environment.
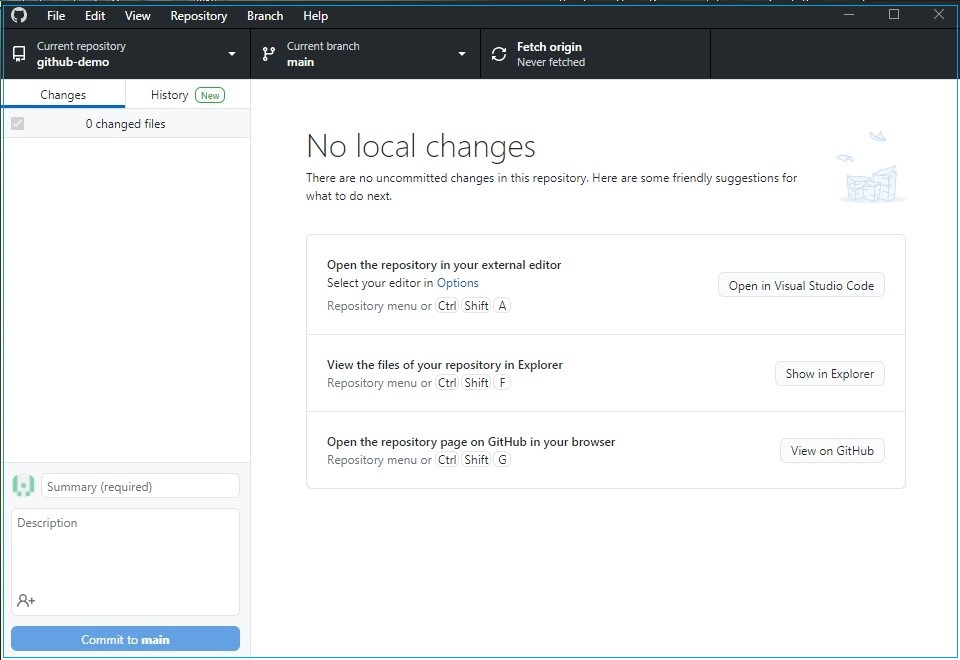
In this window, you cannot find any changed files. To change a file, let’s open it in Visual Studio Code. Visual Studio Code is a code editor which has Git and GitHub functionalities built in. With GitHub integration, it’s easy to code in your local machine to sync with GitHub. In Visual Studio Code, you can see the github-demo repository and other files.
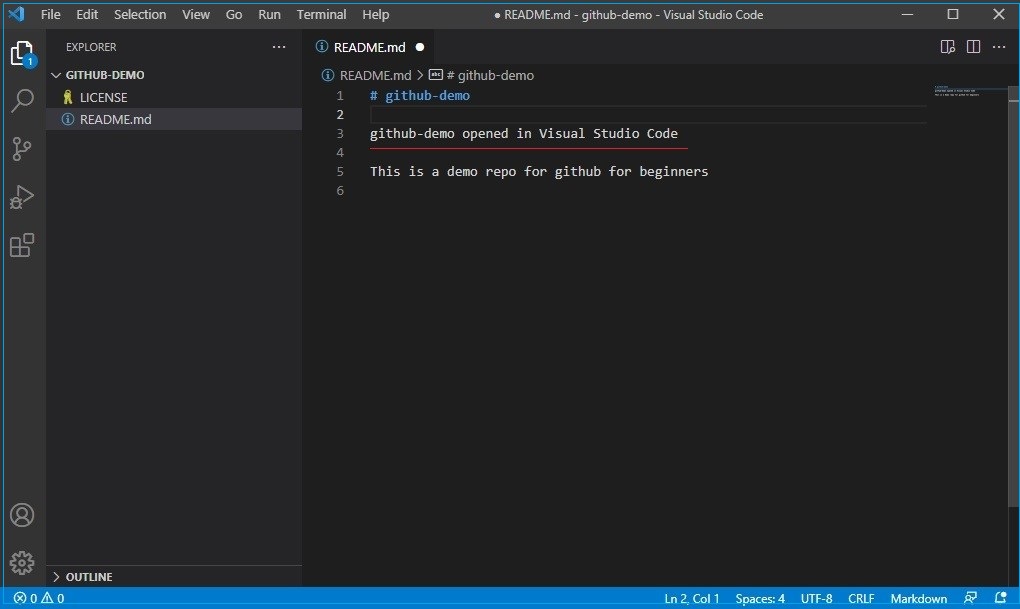
Here, you can make some changes to your project. For instance, you can add some text to the readme file. Until you save the file, you cannot see that change in GitHub Desktop. Once you save the file, it’s visible under the changes tab.
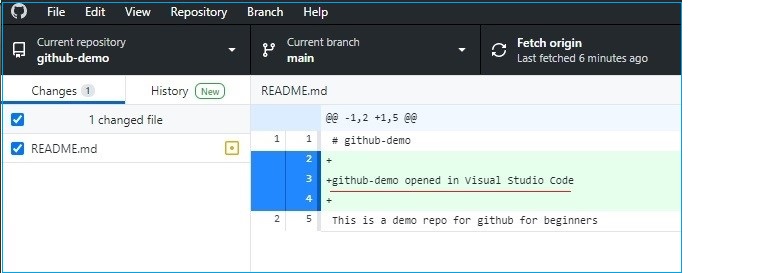
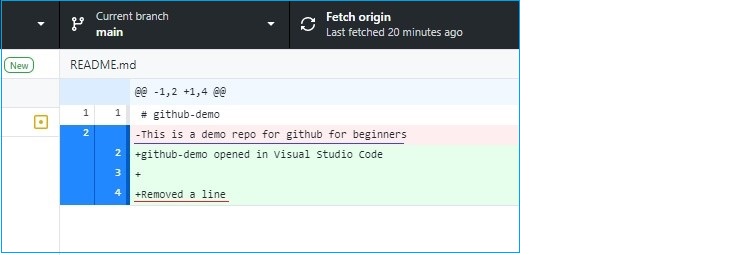
Next, using Visual Studio Code, remove the last line of the readme file and add a new text. Once you save the file in GitHub Desktop, you can see both the deleted line and the new text.
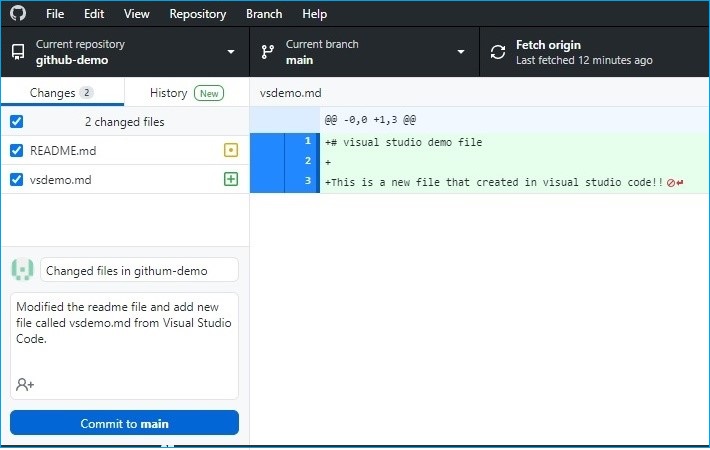
Let’s add a new file called vsdemo.md and add some text. This file will appear on GitHub Desktop.

Push changes to the main repository
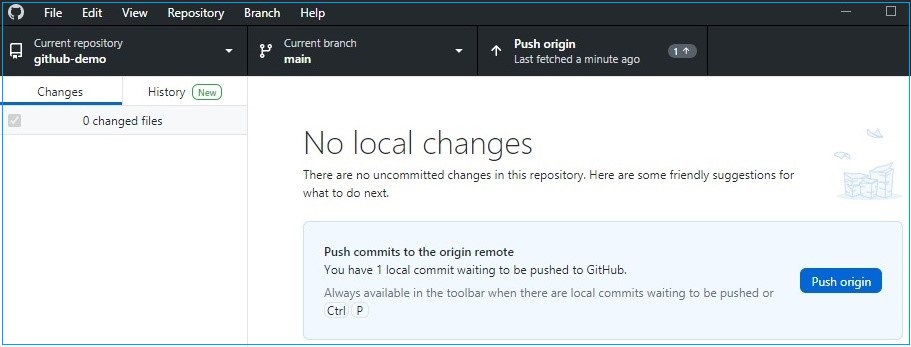
After you finish with the code, you can commit those changes to the main branch. Before committing to the main branch, you could add a title (Summary) and description to the commit message. It’s very important to add a title because it helps whenever you need to roll back to a previous commit. When you click the Commit to main button, all the changes in the left side pane will disappear. But, this only committed the changes locally.
When you click Push origin, you are instructing the GitHub Desktop client to push up all the changes to GitHub.com. You can see that button will change to the Pushing to origin.
When you refresh the github-demo repository page in GitHub.com, you can see the changes that you made in Visual Studio Code. If you click on the title given to the commit message, you can view the history of your commits.
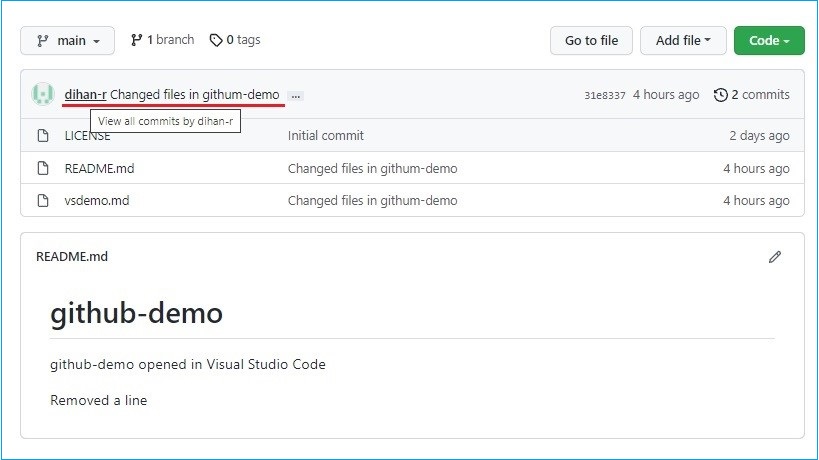
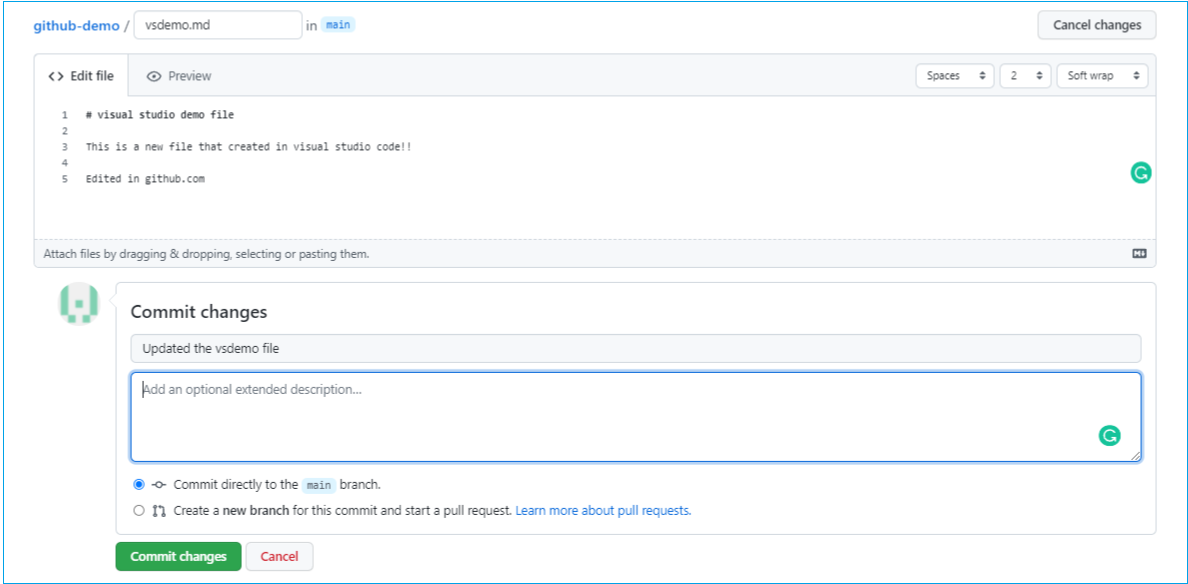
You can edit your files on GitHub.com rather than in Visual Studio Code. For instance, you can add some texts to the vsdemo.md file and commit your changes in it instead of GitHub Desktop. It will commit directly to the main branch.
When you click on Fetch origin in GitHub Desktop, your changes will appear there. You can then click Pull origin and pull that change down to your local machine. When you check the vsdemo.md file in Visual Studio Code, you can see that a new line has been added.
Reference:
Microsoft Ignite sessions
https://guides.github.com/introduction/flow/


