TSScan will work with all modern document scanners and supports: page feeders, card scanners, slides/transparencies, and high-capacity scanners with full-duplex support.
Important: Fujitsu ScanSnap Series support added. Read more about this topic: here
TSScan creates virtual scanners on your remote desktop server which it then maps to your local scanners. This way you basically get a one to one scanner mapping on your terminal server.
No. You don't have any reason to install any drivers on your server but you also don't have to do anything else. The installation procedure takes care of everything and no more than five clicks are required to get TSScan up and running for all your users.
Ericom Blaze RDP
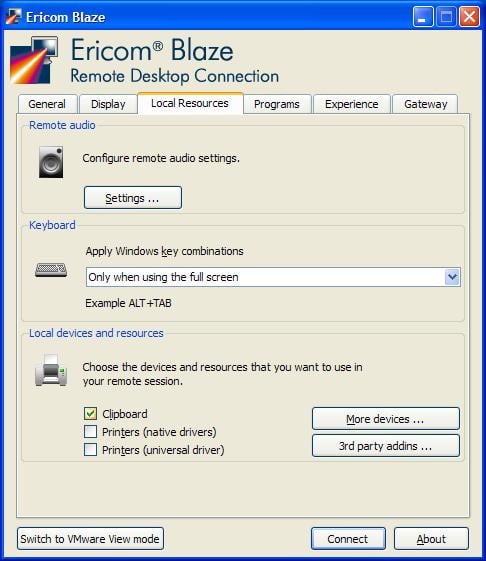
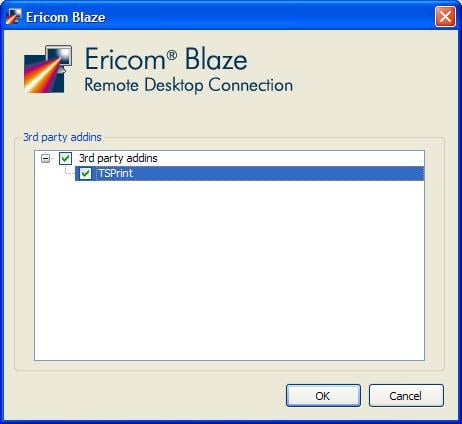
In order for Ericom Blaze RDP to work with TSPrint or TSScan, you have to do the following:
Start Ericom Blaze RDP client and open the 'Local Resources' tab. Press the '3rd party addins' button.
Check the box next to TSPrint and/or TSScan and press the 'OK' button.
When using vWorkspace with TSScan, users experience communication error
The resolution is to install fixes from the following links depending on your client system. One is for 32bit machines, the other is for 64bit machines.
Take a look at this short video tutorial on how to install the TSScan client for MacOS.
You can find the list of supported scanners on Apple official page.
We added support for Citrix and all RDP clients on MAC
You can activate the communication by opening TSScan on the server Desktop. Once opened under tools as described in the picture below, you can activate the MAC communication.
After you switch to it, the window will close and you will be able to see the TSSCan MAC window as below.
When you see the TSScan window as shown in the picture above, simply start scanning and the communication with your MAC will be established.
The device is not open is a common issue where the local scanner is unreachable by TSScan.
The example below (TSScan Server on 2012R2).
As a first suggestion, you could try to check the scanner UI box as it would give you a driver error provided by the scanner manufacturer directly to see if there is another issue with the communication. You can also try and open the following tool on the client-side to see if the driver is working still on your PC as it should:
IrfanView
Try Locating your scanner under File-Select Scan/Twain Source and now try to scan by going into File>Acquire/Batch scanning. Your scanner needs to be visible and working locally, so it's usable by TSScan in the session.
Also, if none of the steps above helped you can try turning your scanner OFF and ON again to see if the connection will be established again with your local PC.
The image below shows the options you receive with TSScan server after the installation.
All settings can be applied on per user basis or if opened as Administrator to all users connecting to this server.
To revert your TSScan 3 to the previous TSScan protocol and usage of the system, you can just un-check the Dynamic Redirection feature shown above. Such a change will result in the scanning behaving as if you still used TSScan 2. All calls issued after the change was made go through the original twain_32_system.dll.
NOTE: This would be recommended only in case your application is having some problems with the TSSCan 3 version you have on the server.
To resolve this issue caused by the latest Microsoft Remote Desktop application version, please follow the steps below:
1. Make sure you're running the latest version of the TSScan Client as well as the TSScan Server.
You can download the latest client version 1.7.0.5 here.
And the server version 3.0.4.22 here.
After you have installed the latest version before you connect to the remote session, please do the following:
2. Open the Microsoft Remote Desktop application and click on the small edit button as marked on the image below.
3. Redirect the TSDataDrive folder into the remote session by clicking on a "plus" sign in the bottom left corner, as marked on the image below. Make sure to select the folder called TSDataDrive located in your Documents folder. Click on "Save."
Yes, ScanSnap scanners are supported with the TSScan but only with TSScan version 3.0.5.13 or higher.
To set up the TSScan with your ScanSnap scanner, please follow the steps below:
1. Make sure that the ScanSnap Manager is installed on your local PC.
This is the main requirement for the ScanSnap to work with the TSScan. If the ScanSnap Manager isn't installed, the ScanSnap device won't be visible as a source in the TSScan application.
2. If you're using the TSScan as a scanner from your application, select the TSScan as a source
3. The ScanSnap should show as a source now in the TSScan application
And the settings for your new ScanSnap scanner should be available now:
Please note that the TSScan Scan Engine 3.0 doesn't support ScanSnap as a source.
Request a free trial license extension in case you need more time to evaluate our product. You will receive your new trial license shortly after you fill out the application.
Cloud services and managed services providers can benefit with our products. The Terminalworks Partner Program enables you to buy license packages of Terminalworks products and resell them.